You want to try tandem road biking without spending $3,000 on a Santana or $4,000 on a Co-Motion. Not that those products aren’t worth it, but that’s a big chunk of change to try something you or your riding companion might not like. You’ve seen the Giordano Viaggio on Amazon for as little as $500 shipped, but it has to be too good to be true.. What are you really getting for 1/6th the price of the real tandems? Is it the Huffy of tandem bikes?
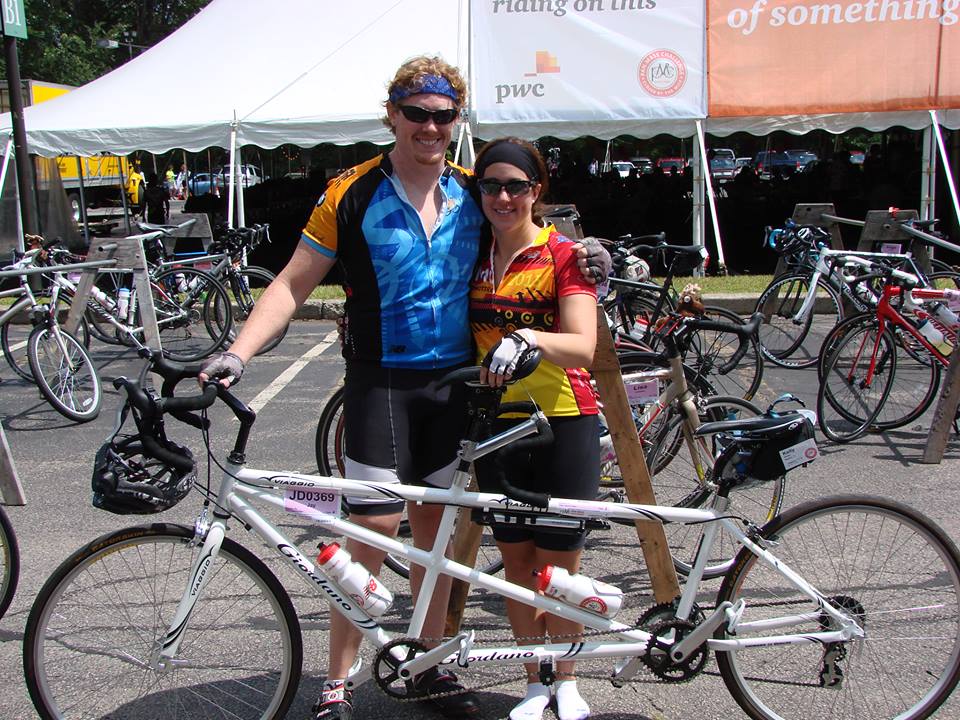
Last year, my wife and I were in this exact predicament: I’m an experienced cyclist, she was a newbie. But for very personal reasons, she committed to riding a lot of miles this year. A tandem seemed like a great way to close the gap in our experience levels and enjoy the sport together. But good luck getting your feet wet for $1000. Enter the Giordano Viaggio from Kent Bicycles..
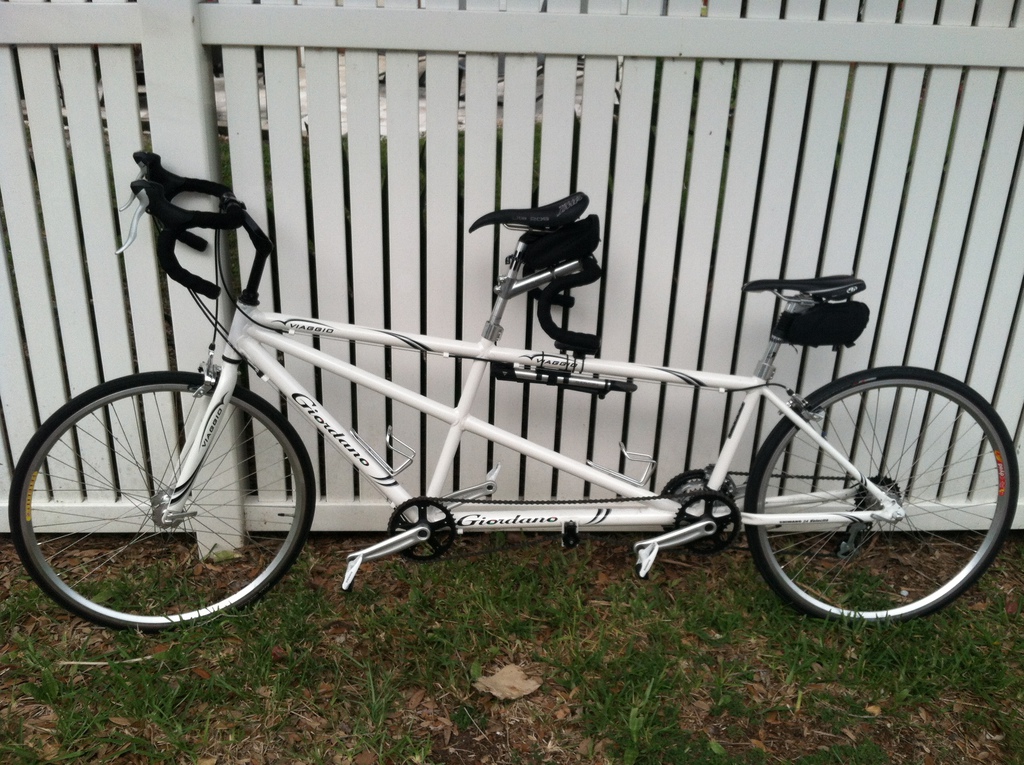
We were fortunate enough to find ours on craigslist, brand new, listed for $300. A woman had purchased it for she and her tween daughter to ride, but the daughter wasn’t feeling it. I figured, for that price, we couldn’t go wrong, so we shot over to the woman’s house to take it for a test ride. Now, when I’m not on the Viaggio, I ride a 2005 Felt F4C with Ultegra wheels and Dura Ace components — so I know what a proper road bike feels and rides like. Not to my surprise, my introductory ride on the Viaggio felt ..pretty awful. Out of the box, this bike is very heavy and slow, the saddles are modeled from some medieval torture machine, and the brakes feel like they’re made of wood.
Whatever, for a $280 initial investment, we decided to see just what we could get out of this thing..
As it turns out, for a total investment of about $1100 ($1300 if you pay MSRP for the bike), and a couple weekends of playing mechanic, you can get a lot. A word of warning, much of what I list here will require you to have special bicycle tools like cone wrenches, a freewheel socket, a chain whip, etc. And, as an entry-level tandem, the Viaggio will require mechanical attention a little more often than a high-end bike. Park Tools makes a great starter kit that I recommend picking up if you purchase this bike.
Here’s our list of upgrades and must-do’s to make this bike a competent road tandem for couples who want to log a few thousand miles per season:
Assembly
- Do not trust any of the bearing assemblies in this bike from the factory. They are often under-lubricated and over-tightened. I would recommend re-packing all bearings yourself with a high-grade grease. At the very least, pop the chain off and make sure the bottom brackets rotate smoothly. Cost: $4
- Wheel manufacturing debris. The wheels on this bike are terrible, but I’ll get to that later on. What you need to know before you even think of taking this bike for a ride is that the stock wheels come full of metal shavings from where the valve stem holes were drilled. Remove the tires and tubes, blow out the wheels and reinstall. Failure to do this will result in numerous flats — be proactive and save yourself the headache. Cost: $0
- Brake pads. The stock brake pads on this bike are a joke. Actually, that’s not accurate. There’s nothing funny about it. Replace the stock pads with something significantly better if you want to be able to stop. This is a safety issue, so I’m filing it under Assembly and not Performance. Cost: $12
Ergonomics
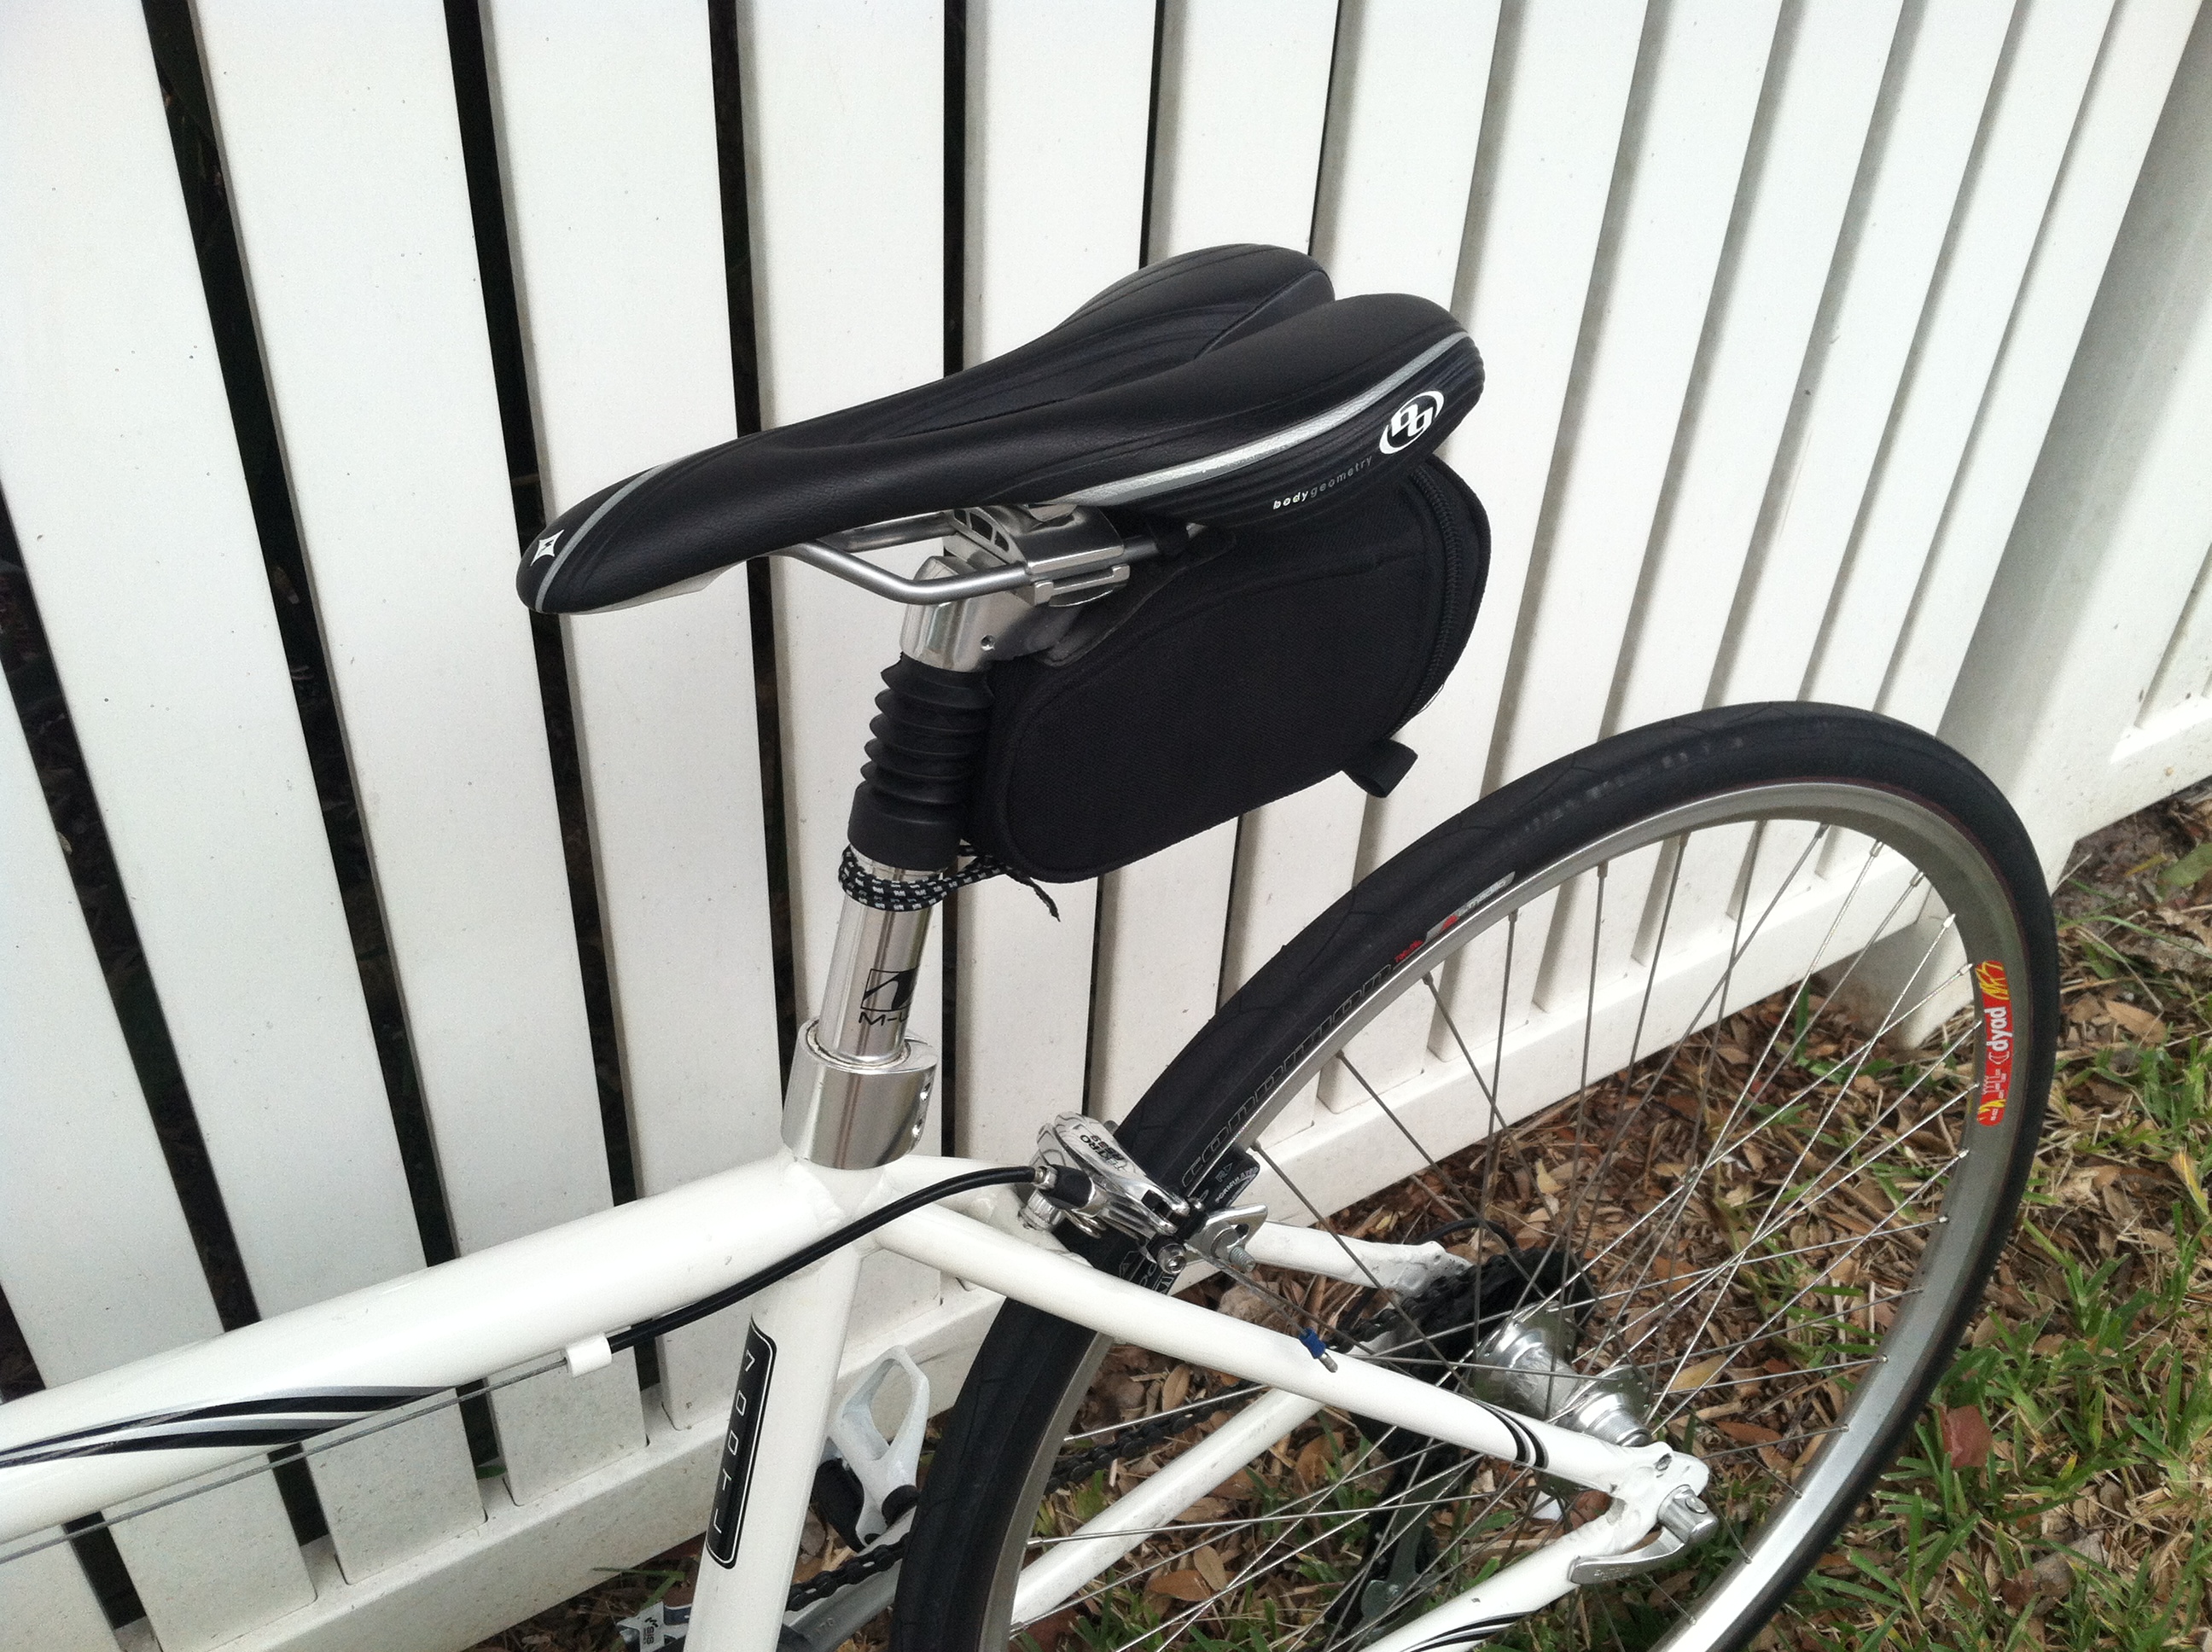
- Saddles. The stock saddles on this bike are about the size of a fist, and unless you’re into that sort of thing, you’ll want to change these out before your first real ride. You don’t have to spend a fortune; literally anything would be an upgrade. Ask your LBS if they have takeoffs from high-end bikes they’ve sold lately. They often have a whole box of these and will readily part with them. Cost: $50+
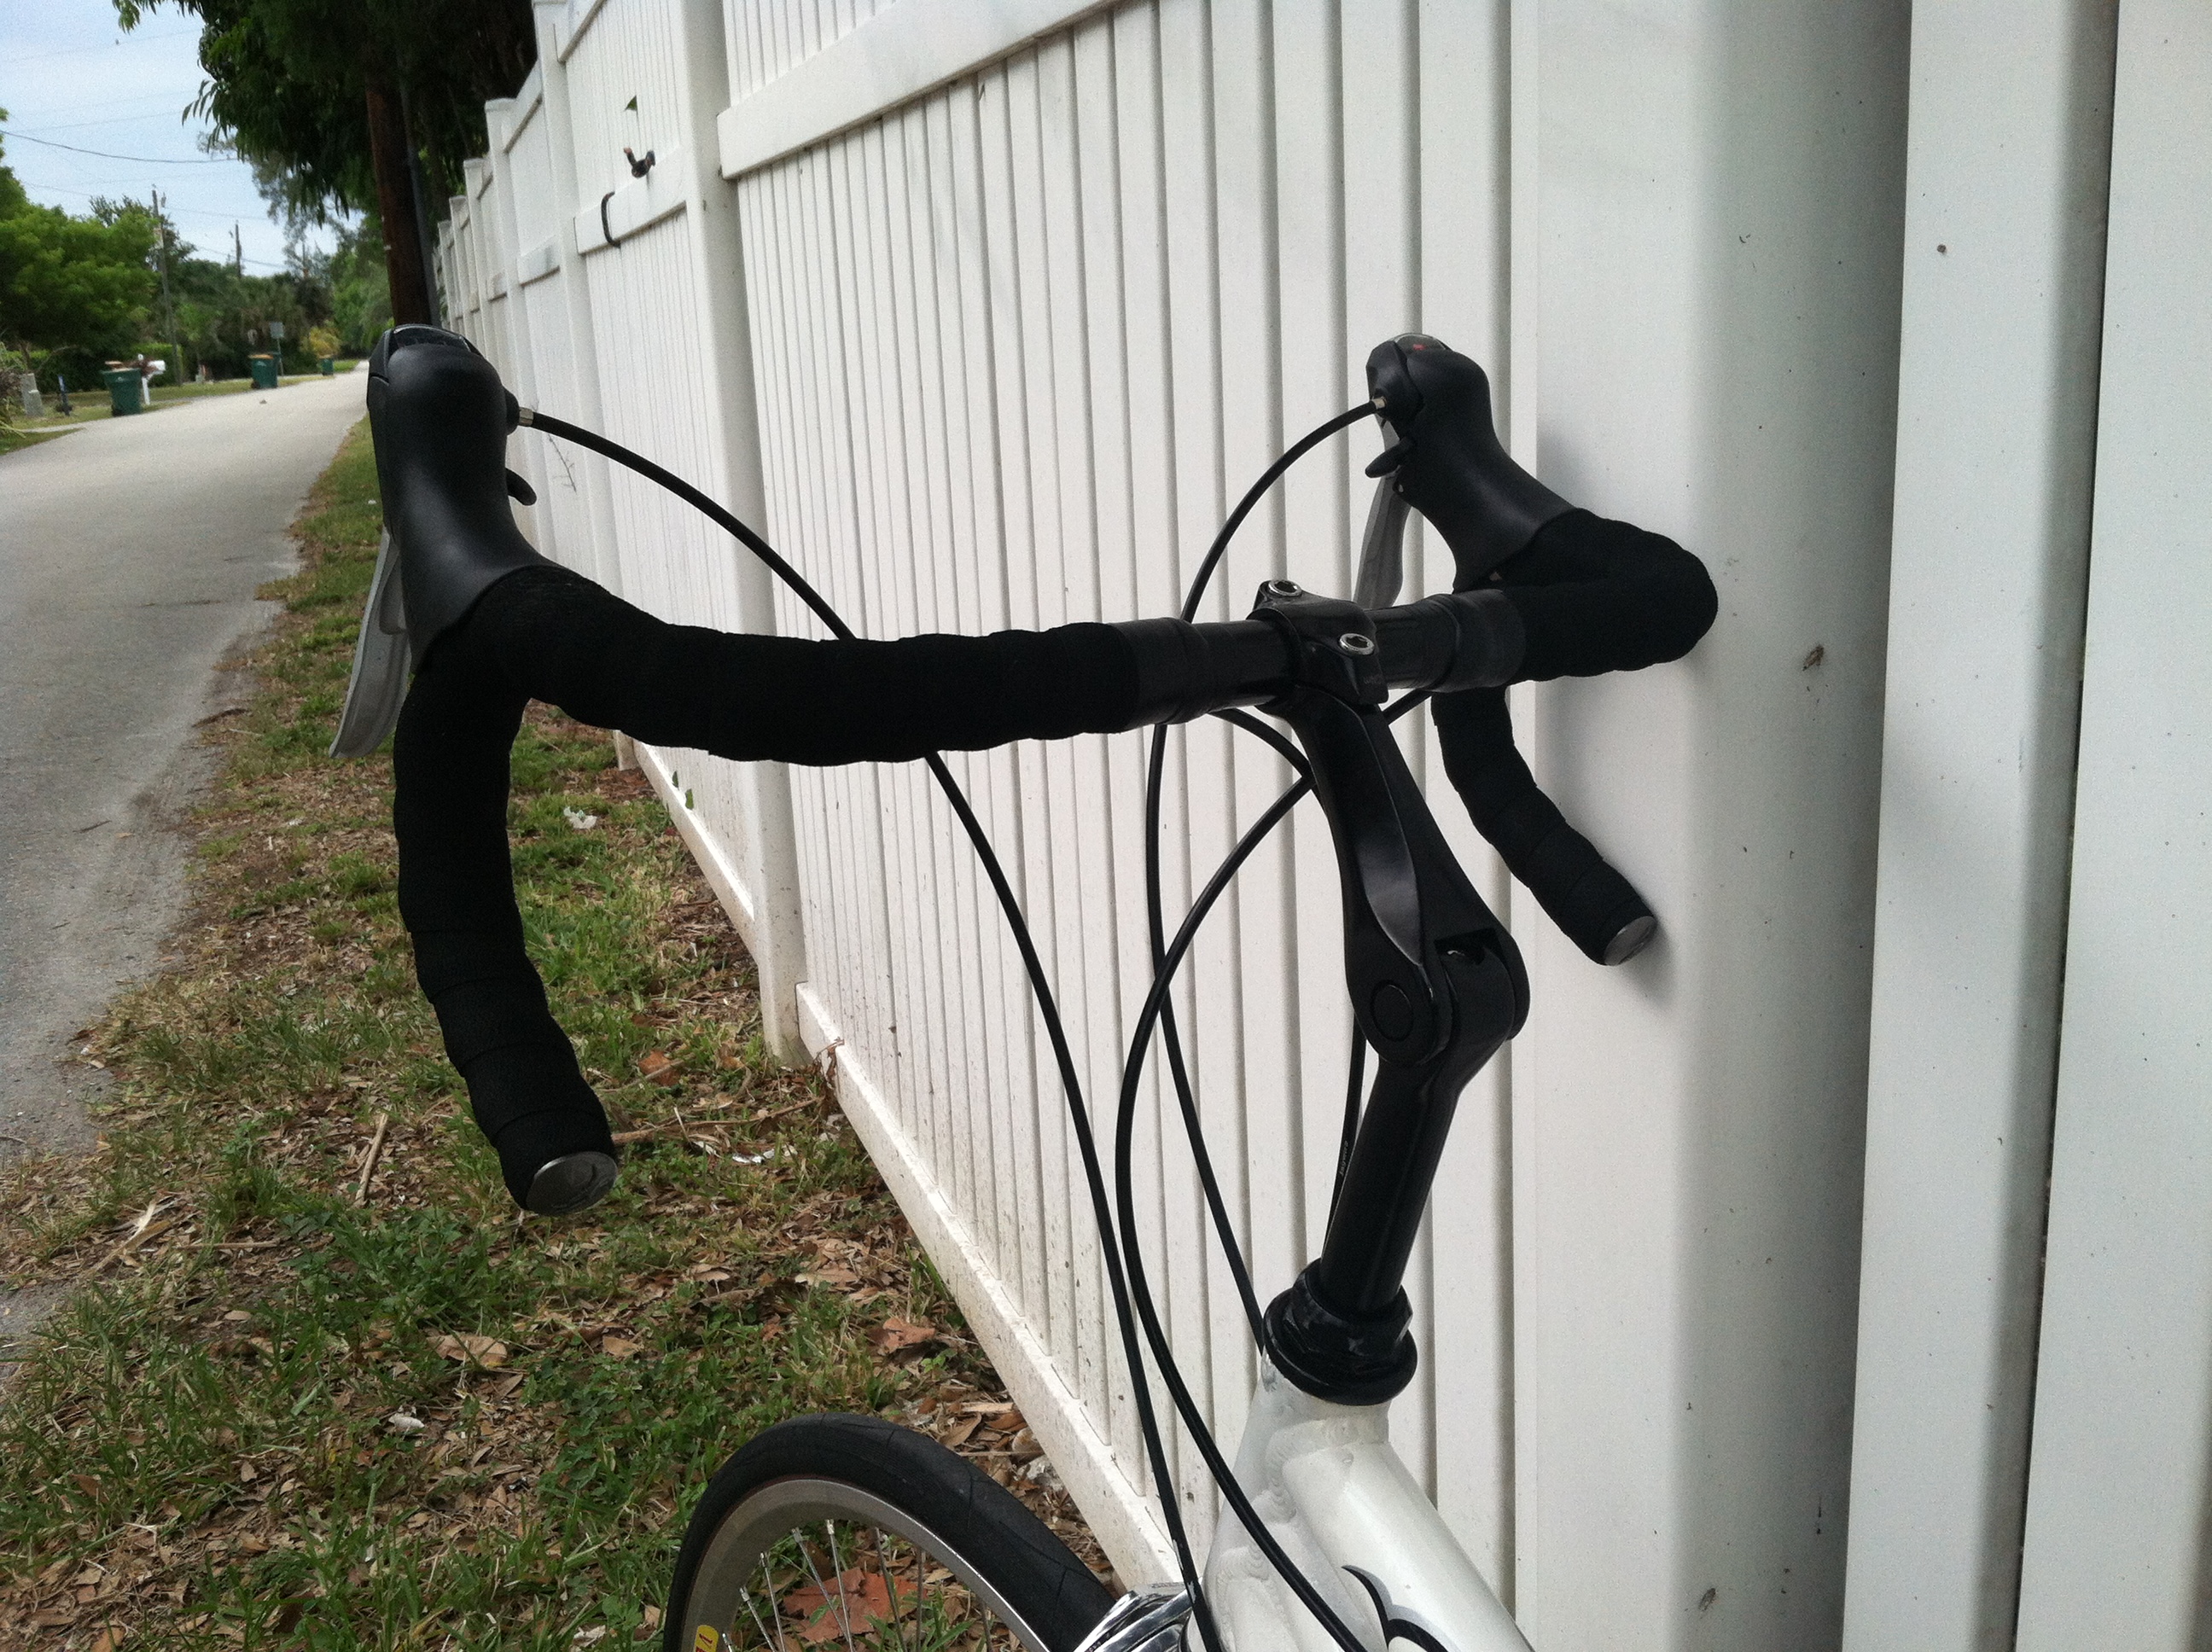
- Pilot stem. Maybe Kent‘s test riders are chimpanzees, but if you’re a human with somewhat normal proportions, you’ll find the pilot stem on this bike far too low, and comically too long. For me, the bike was essentially unridable without an adjustable stem. Fortunately, the stock brake and shifter cables are lengthy enough to reach almost any adjustable stem you can find. Cost: $24
- Sprung stoker seatpost. This is a common upgrade even on high-end tandems, because tandem geometry typically transfers a lot of upward road force directly into the toosh of the stoker (that’s what she said). Unless you’re riding on perfect surfaces 100% of the time, spend a few dollars on such a seatpost for your stoker. The stoker post is the standard 27.2mm diameter, while the pilot post is 25.4mm. Cost: $13
- Padded bar tape. The bars on the Viaggio are of small diameter, and the stock tape is thin. After a few rides, even with padded cycling gloves, you’ll find yourself combing over the bar tape options at your LBS in search of something softer. The good news is, any aftermarket tape you buy will be much better than the stock stuff. You could even splurge on gel bar padding, tho I think that stuff is overpriced. Cost: $34
- Clip-in pedals. Losing the pedals with your feet when communication breaks down is frustrating for both riders. You can avoid that and get more power out of your pedal stroke by installing clip-in pedals for each of you. The Shimano SPD-SL is a very popular, affordable pedal that even comes in white to match the Viaggio. Cost: $84
Performance
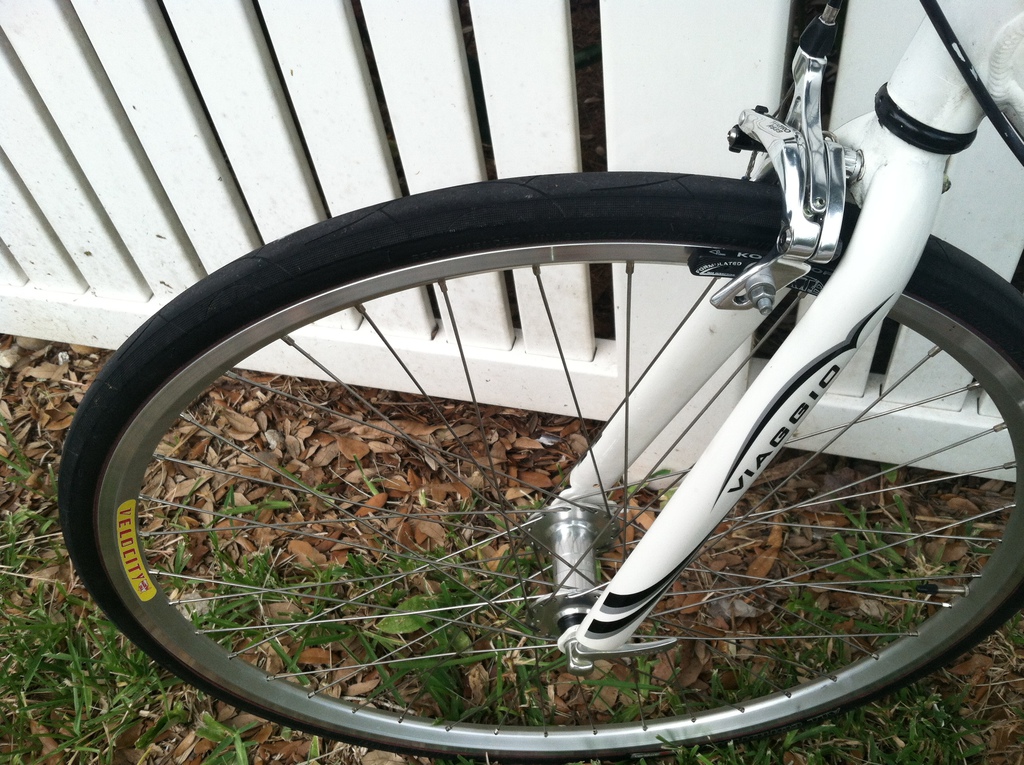
- Tires. The stock tires on this bike are 32mm with a trail-friendly tread. Great for a beach cruiser, not so much for a road tandem. The quality of the stock tires is also questionable; ours had some deformations in the center tread line. Replace them with Gatorskins from Continental, because these things are bulletproof. 700c x 28mm will fit the stock wheels while shaving contact area, rolling resistance and rotating mass. Cost: $80
- While you’re replacing your tires, go ahead and install high-end rim strips to minimize flats, and convert your wheels from Shrader to Presta tubes with a pair of these adapters. Cost: $20
- With Kool Stop or comparable brake pads installed, you’ve probably managed to make your Viaggio stop. But the stock brakes are the same single-pivot garbage you’ll find on any Wal*Mart bike, and they lack a quick-release mechanism. Upgrading to a set of TekTro R539‘s is a tremendous improvement and an easy job. You may need to shorten the rear brake cable housing, so be sure you have access to cable cutters too. Cost: $50
- Wheels. This is a big-ticket item, so if you’re unsure, hold off on this one. In fact, ride the spokes off the stock wheels to be sure you like the sport. They lasted about 500 miles for us, with frequent truing. When it’s time, upgrading to wheels from Handspun with Shimano Velocity DYAD rims and tandem hubs will completely transform your Viaggio. It’s like riding a whole new bike. The spacings for the Viaggio are 145mm rear, and 100mm front. I recommend purchasing from Tree Fort Bikes and taking advantage of their free shipping. Cost: $455
And there you have it. These are the modifications and upgrades we’ve made to our Viaggio, which we just logged 75 miles on this weekend. Overall, we are very satisfied with our budget tandem. It’s comfortable, and while we’re not keeping up with the local Cat 3 crowd, we’re able to complete long rides in reasonable times with minimal mechanical failures. What’s more important, we’re enjoying cycling together without breaking the bank.
Addendum
I wanted to acknowledge another rider’s review of the Viaggio that I found helpful when spec’ing out some of our upgrades. For a second opinion, please check out John McCutcheon’s review Great Budget Tandem.
Update, October 2013

Kelly and I completed the 2013 Pan Mass Challenge — a 2-day, 200 mile ride across the state of Massachusetts — on our Viaggio back in August. We had a fantastic weekend, with no mechanical issues, and averaged a respectable 17mph for the duration of the ride: sufficient proof that this bike can be made into a serious road platform with a little effort and incremental upgrades along the way. Here are some further changes we made leading up to the PMC:
- Chains. When our factory chains were up for replacement, upgrading to the lighter weight and higher quality Shimano XT HG91 series proved well worth it. The bike shifted smoother and pedaled a little easier. The synch chain can be made by joining two of your standard 110 link chains, so you’ll need 3 chains and a chain tool in order to complete the job. Cost: $90
- Cables. It turns out that the rear derailluer cable on the Viaggio is actually a brake cable; meaning it is heavier than it has to be. Its housing is of relatively low quality, too, meaning that you’ll likely adjust the derailluer all day long and still not get consistent shifting performance from it — especially if the stock cable has seen a few rainy days. We replaced the cable with a proper coated shifter cable and our Viaggio now shifts like a dream. Cost: $40.
- Thudbusters from Cane Creek. Kelly’s $13 sprung seat post helped take the bite off of short rides, but we were both still uncomfortable on any ride over 30 miles. We decided to “spring” for the top-of-the-line Thudbuster posts from Cane Creek, which finally gave us the comfort and stamina to tackle 60+ mile rides. As the stoker, she has a long-travel 27.2mm model, and I’m on the short-travel 25.4mm version up front.Cost: $320
Our total investment in our Giordano Viaggio from Kent Bicycles now stands around $2000 — 4 times MSRP, yet still cheaper than a Santana or Co-Motion! Unreal. As an upgrade-ready platform, the Viaggio gave us an opportunity to ease into the sport, ramping up our investment as our experience and love for tandem riding grew. Our bike is a complete joy to ride, it’s been reliable, and easy to repair. It passed our grueling PMC test with flying colors. With over 2000 miles logged on ours, I wholeheartedly recommend this bike to other aspiring tandem teams.
Update, May 2014
With our Viaggio still rolling strong, Kelly and I are gearing up for another Pan-Massachusetts Challenge ride to raise money for cancer research and treatment at the Dana-Farber Cancer Institute. And due to the influx of comments this post has received, I decided to put together an Amazon Wish List containing nearly all the parts needed to transform your Viaggio into an asphalt-shredding steed:
Giordano Viaggio Upgrades Wish List
Remember to sort the list by priority, and add a healthy can or two of elbow grease. Lastly, while the Handspun wheels are available through a handful of vendors on Amazon, you really can’t beat the price and service over at Tree Fort Bikes. If you’re going all-in on the wheelset, let them sort you out, and mention this page when you place your order!
69 Comments
Nicely written.
Nice write-up. I will double check ours, but I believe the spacing (OLD) on the rear is 135mm.
It’s interesting to read different riders’ opinions, and the priority they give certain upgrades. But, at least we all agree on cleaning the metal shavings out of the rims and replacing the brakes and/or pads.
Few (if any) of the reviews of the Viaggio I’ve read mention upgrading the shifters and derailleurs, as we did. I can’t imagine replacing the wheels could transform the bike as much as this upgrade did for us. But we will be pleasantly surprised if it does.
Another wheel option I’m considering, since writing my original review, are Velocity Chukkers on Shimano Deore hubs. Although these are not intended for tandems, I’m sure they would be a huge improvement over the stock wheels for less than half the price of the Dyads.
Hi John,
Thanks for the comment! Your review on Amazon is also an excellent resource — I’m actually going to drop a link to it at the bottom of this post.
As for the wheel upgrade, in my opinion it was 100% worth it. The stock wheels are heavy and weak, and they made a terrible honking sound under braking with dual-compound pads. We grew tired of tightening spokes before every ride, too. Fwiw, I’m 210lbs and my wife is 135lbs. Lighter riders might not run into as many issues with the stock wheels.
With the Handspun / DYAD wheels, the bike handles sharper and rides much smoother. We picked up 1.4mph average on our very first ride with them as well. I would buy them all over again in a heartbeat.
Happy trails!
Jay
Jay,
I want to thank you for the excellent review you did on the Viaggio tandem, “The Giordano Viaggio: Building Your Own Tandem”. My wife and I were in much the same spot that you and yours were in. Wanted to try tandeming but couldn’t afford a Co-motion at $5000+ out the door. Your honest and intelligent writeup and suggestions helped us out enough to “give-it-a-go” and join the tandem world. I’m a bit of a “wrench” and have a good set of bike repair tools from Performance Bicycle. Coupled with your “must-dos” and my mechanical ability gave us the confidence to place an order through Target for the Viaggio just yesterday. I’ll keep you informed of my progress of upgrading the bike, if you don’t mind, and maybe ask a few specific questions along the way.
Many thanks,
Barry
Hey Barry,
That’s great! I don’t mind at all — keep me posted 🙂
Jay
Jay,
Was replacing the tires part of your upgrade to the new wheels? The reason I’m asking is that I’m having a hard time imagining that just replacing the wheels could make a bike handle sharper, ride smoother, and add that much to your average speed. Could the tires be part of the difference?
John
Hey John,
Nope, I went through a set of Gatorskins on the stock wheels before I upgraded wheels. Rotating mass has a massive impact on handling. The DYAD rims are lighter and stronger than the stock stuff. They’re cast from a single piece of material, rather than joined like the stock wheels. The Shimano tandem hubs are also heavier duty and roll more easily with 330lbs of riders on them.
I’m not trying to justify my purchase, and I don’t work for Handspun or anything 😉 Our bike is truly a lot more fun to ride, and significantly faster, after upgrading the wheels.
Jay
Wow, now you’re getting me excited to upgrade the wheels!
But first, I will need to install the new crankset I just scored on eBay. Check them out: http://www.ebay.com/itm/111108967865?ssPageName=STRK:MEWNX:IT&_trksid=p3984.m1439.l2649
John
Those look _awesome_! What a deal, too. Please let me know how they work out!
Btw, Kelly and I are both riding on Thudbuster sprung seat posts now. Her’s is a LT (long-travel) model while mine is the ST (short-travel). I think this was the right balance: the LT in back is warranted because the stoker sits right above the rear wheel and gets a very stiff ride. The ST up front is adequate and really takes the edge off the road, without sacrificing too much power to the bounce effect. Another $300 spent on this bike, but we’re tackling a 200 mile weekend at the beginning of August and need all of the help we can get in the comfort department.
I was pretty jazzed to find the crankset, at half the price I figured I’d end up paying for either the Sugino XD600s or the Stronglight Z’Lights. Plus they come with bottom brackets, which I figured would add another $50 to the cost. I really wanted the longer 175mm crank arms in front. I tend to pedal faster than Patty, so this should help her keep up.
As for the wheels, did you have to spread the rear of the frame to get the 145mm spaced hub in there? I measured our again, and it’s just over 5 1/4″, which would be 135mm. Another reviewer on Amazon mentioned his being 135mm, as well.
We’re a long way from being able to do a 200 mile weekend, if ever. Good luck to you and Kelly. We’re a heavier team than you, and my wife, Patty, has arthritis in her knees, so we’re working towards a couple hundred miles a month. Getting old sucks! In addition to the tandem, I ride my single bike a couple hundred miles a week. But it’s harder for Patty with her knees.
The 145mm rear wheel comes with a bunch of spacers on the axel, so I simply removed about 8mm worth of spacing and it fits fine. The quick-release skewers grasp the frame without issue. If you can find the 135mm rear wheel, I’m guessing that is in fact the right size, but the 145mm wheel can be made to fit in a few minutes if you have a set of cone wrenches.
The eBay seller on the cranks contacted me and canceled the transaction. Said they didn’t have the item in stock, and that it was listed by mistake. Bummer!
Hey Jay, me again…
I was wondering if the wheelset you used, the Dyads, have the CNC machined sidewalls for the rim brakes. Even though our original wheels are holding up just fine, the tires are about worn out and it seems like it might be a good time to replace both.
Thanks,
John
Jay, you have a pretty tall stem on that bike. How tall are you? I am 6’7″ and I am wondering if there is any way to get this bike to work. I just got married and would like to ride a tandem with my new wife but the prices for most of the new ones are pretty daunting, I was looking at a Hokitika XXL/L bike but it would cost over $3000. A Co-Motion would be over $4000 with the custom sizing I would need. We want to just try out tandem cycling before we decide to shell out that kind of money.
Also, Peter White Cycles makes a wheelset based on the Shimano tandem hubs for $366 with Sun CR-18 rims, scroll down to the bottom of the page here: http://www.peterwhitecycles.com/tandemparts.asp
Peter built my dynohub wheel that I use on my single bike for night time rides and it’s been very durable despite only having 28 spokes. It even survived a very rough accidental off road excusion with just a minor spoke adjustment. I am extremely happy with it.
Hey Jim,
The stem on our Viaggio is indeed quite tall. I’m only 6’0″, but I’ve got long legs and a short torso, so I needed something to bring the bars a lot closer. At your height, you will certainly need to replace the stock pilot seat post as well (I did). Something 450×25.4mm or longer will work.
I would say “Go for it!”, especially if you’ve got an older bike laying around that you can cannibalize for a saddle and some brakes.
As I mentioned above, recently we upgraded to Thudbuster suspension seat posts from Cane Creek (ST up front, LT in back). We picked up another Selle SMP saddle for Kelly, too. I also upgraded the chains to Shimano HG91 series. At this point, I’ve sort of stopped tracking our investment in the bike. I’m sure we’re close to $2000 by now, but we’ve logged almost as many miles on it, and the cost has been spread out over 8 months. It’d be hard to complain about..
I *don’t* think our Viaggio, even as it sits today, is as good as a Co-motion or Santana. Maybe it’s almost as good as Hokitika? Probably not quite. But — for the initial investment, and the fact that we were able to get out on the road for under a grand.. I’m pleased.
That’s good to know about the wheel set! I’ll certainly check them out if our Handspun set needs replacing. So far, so good. But we’re headed to Massachusetts to ride the Pan-Mass Challenge in just 2 weeks, and MA roads are a whole different ballgame 😉
Good luck, Jim!
Thank you for the insightful review. I am curious, for the investment you put into this bike might someone like myself be better off spending the $1100 on the Trek tandem. Or would I have to put an equal (or close to) investment on that bike as well.
http://www.trekbikes.com/us/en/bikes/town/recreation/tandem/t_900/#
Hey Marcus,
That’s a really good question. I think it depends, at least in part, on the kind of riding you’re looking to do. The Viaggio’s geometry is better suited for road applications and will accommodate a wider range of rider sizes, while the Trek is more of a rail trail / path-friendly setup and requires a smaller stoker than the Viaggio. That said, with some road bars and different saddles, I see no reason why you couldn’t make the Trek a more road-oriented ride. And it does come with an eccentric bottom bracket, which is a significant improvement over the Viaggio. I would say you could probably build a decent road platform from either; the Viaggio lets you get started for half the cost, while the Trek saves you from having to upgrade wheels and brakes before long.
Not really a definitive answer, but because you’re gonna eventually have to turn a wrench on either bike, I think it’s the only answer I can give 🙂
How did you get the SRAM apex brakes to fit. I just bought some and they are too short. The pads are over the tire not the wheel.
Hi Gary,
I actually installed TekTro R539 brakes; the SRAM Apex were suggested by other users on the Amazon reviews for the bike, and are generally more reputable while in the same price range as TekTro. It sounds like, based on your experience, they are incompatible. I hope you were able to return them. I’ll modify the post accordingly. Sorry about that!
Jay
Great write-up! Thinking of doing this same type of thing but which stem did you use exactly? Appreciate any insight.
Hi Tim,
Thanks for saying hi. It’s been about a year since I bought the stem, but I’m pretty sure it’s this one (I purchased it from my LBS):
http://amzn.com/B0042QB5FC
Hope this helps,
Jay
Hey Jay:
Nice write up on the Viaggio Tandem.
We have the Giordano Junior Road Bikes for our little girls, so we’re already familiar with the value of Kent Bicycles.
They do a good job of giving entry level bikes that are sturdy & a good value for the price.
In your case, you go the best of both worlds: Great beginning value & ability to customize to your needs.
The classifieds & Craigslist are full of Tandems purchased at super high prices, and sold at a loss by folks with less initial caution than you displayed !
We would be on a Viaggio now, but we did manage to find a great deal on a used Tandem, a Sport Touring Custom model by Curtlo Cycles: http://curtlo.com/frame_pages/tandem.html
We were able to score this unit for $ 500, with decent Shimano Deore XT components & Mavic wheels with Phil Wood hubs.
Only 7 speed, but we can upgrade that.
My wife still rides single, but my 3 little girls fight to ride stoker with me – they love, love, love being on the Tandem with Dad !
We’ve even found were pretty quick, sometimes. (flats, downhills, you know !)
My 17 year old son is a Cat 3 racer & we were able to drop him the other day for several miles & then keep up nicely the whole 20 mile ride.
I couldn’t have ever done that on my single bike, no way !
So, thanks for your review in particular & sharing your love of Tandeming, too.
Your enthusiasm encouraged us to take that first step in buying one.
I told the wife if the Craigslist ones we lined up to see were lacking in any way, we were going to go the Giordano Viaggio route.
I’ll still say that is a super option for those who don’t want the hassle of trying out used bikes, or aren’t near a city big enough to have a good selection of used tandems.
We’re going to do our first bike rally on the Tandem this weekend – a metric Century N of Houston.
Keep the rubber side down, Jay !
David Alan & crew in East Texas
Terrific write-up.
I am looking to get a tandem to ride with my 11 year old daughter. She is 4’6″ with a 22″ inseam. Do you think the Viaggio Tandem would fit her?
Hi Patrick,
Kelly is only 5’5″, and she has about 5″ of seat post exposed. But, between the seat height and the bar reach, it might be a bit of a stretch for your daughter. I can post some specific measurements later tonight if that’d be helpful.
Jay
If you get a chance to post measurements that would be really helpful. As you noted, getting a tandem for less than $1,000 is tough and this bike with your modifications is a great option. But I would prefer to get a bike that doesn’t require pedal blocks. Thanks again for your write-up and help.
Jay,
I appreciate the write up. I just got a similar deal on craigslist that you did originally. $300 brand new. I’m now looking at making the upgrades before riding this guy, including new tires, pedals, brakes/pads, and saddles. Documenting your experience has sure proven helpful for myself and others.
My question is this: Do you (or anyone else for that matter) have an idea of what the minimum tire width is that the original wheels would accept, be safe, and not be prone to flats? Would they take down to a 23c? I know you mentioned 28 in your write up, but I’m curious.
Thanks!
Hey Brett,
Glad you found this post helpful! I’m almost positive that 23mm would not fit the original rims. 25mm might be an option, but my hunch is that the resulting profile would adversely affect handling, and be more prone to flats. You’ll likely have to go to aftermarket rims if you want to run narrower tires. But going from 32 trail tread to 28mm road rubber will make a huge difference, I promise.
Good luck,
Jay
Jay,
Can you point me in the direction of a bike stem that will work? I’m not sure of what will work for this bike. I’m 6′ tall. What are the types and dimensions of stems that will work.
Thanks again. I’m just finishing up my last few upgrades and then I think I’ll be waiting for the weather.
I realized you addressed this question in another response above. Thanks. If you have other input than what you mentioned above I’d love to hear it.
Jay,
Hey I noticed that you and I are built similar. I’m 6’0″ with longer legs and shorter torso as well. I was wondering, what size stem did you put on your bike? Also, what size seat post worked well for you?
My wife and I just bout ours and we’ve only been able to put just over 100 miles and my back is killing me with this stem and seat post.
Thanks,
Jordan
Hi Jordan,
Both the stem and seat post(s) on our Viaggio are linked in the comments! 🙂
Jay
Great,
Thanks Jay!
Hey Jay,
I just bought the tektro R539s but they don’t fit on the bike. How did you get around this?
Thanks
Hi Jordan,
The only modification required to fit the R539’s is to shorten the rear brake cable housing. You’ll want a pair of cable cutters to do that correctly (I mentioned this in the writeup). You may also want to mix and match the mounting hardware from the stock brakes to mount them up. Other than that, they should be a bolt-on part. What problem are you having specifically? Can you post a picture to http://postimg.org maybe?
Jay
Hey Jay,
Thanks for responding, I bought a pair of the black tektros and I was having problems with the recessed brake mounting bolt. The recessed bolt was too large for the fork and the rear bridge. I fixed the problem by drilling a larger hole with a 5/16 drill bit.
It fits like a charm now!
Thanks Jay! I’ve actually put on just about all of the recommendations you gave in the write up. I especially love the new wheels!
I’m glad you were able to make them work! Strange that I didn’t have to do any drilling. Mine were the silver R539’s, long (47-54mm).
Aren’t the wheels the best? It’s a completely different beast 🙂
Yes the wheels and tires make a world of difference. Well, really all the upgrades make a world of difference. But we just finished a little 25 mile ride and increased our average speed from 16mph to 17.1mph. Feels good.
Thanks again, Jay
Hi Jay, THANKS for a great writeup and list… it was good to see I’ve made nearly identical upgrades over the last 2 years (albeit I learned the hard way). I did grab the Tektro as you recommended and I also am having a problem fitting the screw/bold on the front forks, I see someone else drilled it out – so I will give that a try.
As another upgrade, I’ve added inline brake levers for the top bar…. helps save hand numbness.
how did you mount the tektro brakes? are those not recessed mounting style?
JSHearne:
You must have missed the numerous times in the comments above yours where Jay covered this.
The back side of the brake mounting hole, where the stock one has it’s nut sitting, that part of the frame is drilled out slightly larger diameter, to accomidate the Tektro upgrade brakeset’s better & slightly larger recessed mounting nut.
One commenter said it’s a 5/16 ” drill bit. I’d double check to be sure.
Cheers, David Alan – affordableroadbikereview.wordpress.com
I saw the bit about drilling. I was trying to avoid that. I didn’t understand how Jay mix and matched the mounting hardware to get it to fit cause the bolts are too short. Unless he swapped out the bolts from the original brakes which i dont see how it would work because the R539’s require a flat head bolt to fit in the counterbore in the brake arm.
JS:
The recessed mounting nuts are made in different lengths, ostensibly to accomidate the various frame mounting bosses (tech term for the part of the frame the brake mounts to / thru) .
Due to the fact that I have 20+ bikes and have built quite a few, I have amassed quite a “set” of the different length brake caliper mounting nuts, in several different lengths.
You won’t likely find those anywhere but a bike shop – and I bet if they dig thru their ‘collection’ they have what you need.
If not near a good shop, Amazon lists these:
http://www.amazon.com/SRAM-Force-Rival-Caliper-Mounting/dp/B0050VFNTM/ref=sr_1_3?ie=UTF8&qid=1413381722&sr=8-3&keywords=bicycle+brake+caliper+mounting+nuts
Long nut for front brake mount:
http://www.amazon.com/Shimano-Pivot-Nut-27mm-Front/dp/B00CRF14VU/ref=sr_1_13?ie=UTF8&qid=1413381722&sr=8-13&keywords=bicycle+brake+caliper+mounting+nuts
Short one for rear brake mount:
http://www.amazon.com/Shimano-Pivot-Nut-10-5mm/dp/B00CRF12FI/ref=sr_1_14?ie=UTF8&qid=1413381722&sr=8-14&keywords=bicycle+brake+caliper+mounting+nuts
In any case, it sounds like you can tackle this. Be sure when drilling out frame to accomidate nut, that you figure whether you need to go all the way thru the frame boss, or just one side, probably the backside, opposite caliper.
I did what you are trying to on my Denali road bike, very similar to your Viaggio Tandem (both made by Kent Bikes), and the Tektro Calipers mounted beautifully, and the bike had super braking.
Cheers & safe riding,
David in East Texas
Hello Jay:
Q for you on the Viaggio Tandem:
Do you know the weight of the bare frameset, frame & fork ?
I’m told the tandem is 42 # stock.
Thanks for your help,
David in East Texas
PS: great blog you are helping a lot of folks……
Hi David,
Your blog rocks too! I checked it out just the other day. I don’t have a definitive weight on the frameset, but 42lb for the assembled bike sounds just about right.
I’m considering purchasing a spare “parts bike” brand new from Amazon in case we ever suffer a frame crack. I can’t imagine the price of a brand new one will ever be any lower ($488 shipped), nor can I imagine that Kent will make this bike forever. So now seems like a good time to secure our tandem riding future. If I pull the trigger on one, I’ll disassemble it and study it a bit more — I can certainly get you a weight for the frameset and fork then.
Cheers!
Jay
Jay:
Thanks, glad you enjoyed my blog. I started it when our family began riding & road racing in 2011.
In it, I try to cover ways to cycle affordably. Our whole family (7 of us) ride road, so we log around 20,000 miles per year, on average. Our kids race – even went to Junior Road Nationals, and made the podium.
Riding this extensively, we find the weak spots, usually. We have to do it on a budget, of course. And I’m happy to share what I’ve learned with others.
I just published a post showing our unique custom tandem & I also covered (very briefly) the Viaggio tandem & linked to your blog – hope that’s ok !
http://affordableroadbikereview.wordpress.com/2014/10/15/our-new-tandem-a-curtlo-custom-road-sport-touring-bike-an-affordable-craigslist-find/
On the Viaggio weight, thanks for the input. I did have a guy on Amazon answer that he had stripped his Viaggio down totally for paint & upgrades and the weight was 8# for the frame & 3.4# for the fork, = a frameset weight of 11.4 #.
Assuming that’s accurate, the balance of the stock ‘stuff’ – wheelset, group, seats, stems, seatposts, etc must weigh around 31 #.
Obviously, many equipment upgrades could shave that down some.
I just found this post, where a very knowledgable tandem expert, Mark (of tandemgeek.wordpress.com ) discusses all about tandem weights:
http://www.bikeforums.net/tandem-cycling/90075-tandems-comparison-weights.html
Safe riding & God bless you, Jay.
David in East Texas
So I really enjoyed the write up, and bought a Lambo version of the bike, used, locally, I did the brake upgrade and the pads are about 1/2″ short of the wheel rims…any suggestions? Any help would be appreciated. New to biking
Mike
Hey Jay,
There hasn’t been much activity here lately. I found and followed you on Strava and don’t see much activity there either. I hope you’re still riding and all is well.
John
Hey John,
We’re doing well! Tho you’re right, we’ve not been riding very much. We bought a real fixer-upper of a house and have been consumed with working on that most weekends (and weeknights, holidays, etc.. ;)). Even when we are riding these days, we don’t bother with Strava anymore. It was a great tool to show our sponsors how much effort went into PMC training, but beyond that, I just couldn’t care less to log all of our data. We’re not setting any records, that’s for sure!
Hope you are well and keeping the rubber side down too!
Jay
Great thanks for all this information!!!!!!!!!! My wife and I have been on an old Burley tank of a tandem (named Sherman of course!) and it’s time to upgrade but Santana/Comotion etc are not an option. My greatest concern has been the lack of disc brakes on the Giordano but that seems to not be a problem for you and my weight and my wife’s weight are almost identical you yours and hers. Placing my amazon order tonight and I’ll keep you posted…..good luck on the house!!
That’s awesome, Bruce! Glad you found this review helpful. The house is actually all done now! It was a heck of a learning process. Kelly and I are getting back into riding this spring. We’ve certainly missed it.
Feel free to hit me up here with any questions as you go about transforming your Viaggio!
Great review on the bike, it motivated me to make the purchase. I have done all the recommended upgrades less the wheel set, that is on my to do list about 3 items down. I’d really like to upgrade the bottom brackets and crank sets which will probably require a front derailleur replacement. Do you have any component suggestions?
Hi Clint,
Are you looking to install an eccentric bottom bracket, and do away with the sync chain idler ring? If so, it might be a challenge to find one that will fit in the Viaggio’s frame. Most EBB’s require a larger housing, i.e. a frame that’s built to accommodate them. That said, you could certainly upgrade the stock bottom brackets to something of higher quality, as we did, which will improve crank rotation and wear. I don’t recall the specific part number, but we went with Shimano BB’s for ~$25 a piece. Lightweight, and custom-length crank arms are also a great idea, especially if there’s a large height discrepancy between you and your stoker. You should be able to swap those out without replacing the front derailleur, too.
Hope this helps!
Jay
It does help and I followed your recommendations. We are having fun with the bike and I’m enjoying the tinkering. REI had the bottom brackets and were less expensive then online and shipping. Great site, thanks for keeping it going.
This page is awesome!
About 18 months ago, my wife & I bought a Sun Brickell 7-speed as our first attempt at tandem bicycling. With some good advice from other folks (basic do’s & don’ts of tandem riding), we got off to a great start. Soon we were riding 10-20 miles easily and wanted to go longer. But we discovered that this comfort-style bike wasn’t suitable for going longer distances. Not having thousands of dollars to spend on a really nice tandem, I began searching for a less expensive upgrade and found this page.
Long story short: We bought a Viaggio and it was delivered 3 days ago.
Question about the brake pads: After upgrading to the Tektro brakes, which brake pads (the ones that came with the Tektro brakes or the Kool Stop pads) did you use and why?
Question about the sync/timing chain idler: Has anyone had alignment problems with the stock fixed (slightly adjustable) idler wheel? Ours seems to be positioned (as manufactured) such that it’s impossible to be aligned with the chain side-to-side AND impossible to be raised/lowered enough to maintain the correct tension. Any suggestions for alternatives or modifications? Has anyone actually made a modification that they would recommend to others? I’m considering getting a rear derailleur and retro-fitting it as a chain tensioner. Any thoughts or advice?
Thanks again!
Paul
Hi Paul!
Glad you’ve found this page helpful! I think most of the valuable information has come from comments 🙂
We’re running the Kool Stop pads on the Tektro brakes. With the added weight of a tandem, you’ll want the larger contact area on the rim you’ll get with the Kool Stop MTB pads.
As for the idler ring, I was able to align ours well enough. If you can’t get the correct tension with it, tho, I would buy a chain tool and some master links, and shorten your sync chain.
Hope this helps!
Jay
Jay,
Fantastic write-up! I’m a novice bicyclist myself but my gf doesn’t know how to ride a bike, so thinking of going the tandem route. Love the upgrades and suggestions.
Any idea on how much a LBS would charge for assembly/installing the upgrades, everything total out the door? Just a rough idea would help.
Also, for transportation, do you use a bike rack? If so, any recommendations there?
Hi Ajay,
Really depends on your LBS. Many shops will insist that you buy the parts there, if you want them installed there — which is pretty fair, in my opinion. If you have a good rapport with your LBS, I’m sure they’d discuss your options. Are you thinking of doing the wheelset and Thudbusters right from the start? Those will definitely be special order. The rest of the parts, your LBS should stock. In total, it shouldn’t take a qualified tech more than a few hours to install and tune everything I’ve listed out. Can I make a suggestion, tho? The installation work is really straightforward and pretty fun, if you ask me. It’s good to learn a bit about the bike, in case you have a mechanical failure on the road, too. I’d take the money you’d spend on installation, and put it towards a fitting session for you and your girlfriend. A proper fit will ensure she’s comfortable and happy on the bike 🙂
Jay
Hi Jay,
It is nice to see another Giordano Viaggo owner. I have upgraded mine to the point that the only original left is the frame. But I enjoyed the process to being able to bike and upgrade to my specific needs (our needs) without spending a big chunk of money.
Hi Jay,
Thanks so much for your incredibly helpful review! Your review was the deciding factor in getting my wife one of these as a birthday present, I’ve done many of the upgrades you mentioned, and we are enjoying riding it very much.
I do have one question. My understanding is that higher-end tandems have an over-sized bottom bracket tube so that an eccentric bottom bracket can be rotated to take up any slack in the chain between the two sets of pedals. The Viaggio has an extra cog which moves up and down instead, and that cog is just plain NOISY. Have you found anything that is able to help this? It seems that this is something that can’t be upgraded.
Thanks again,
Ross
Hi Ross,
I’m very glad you found this guide useful, and that you’re enjoying your Viaggio! You’re correct that most higher-end tandems have a larger / eccentric BB. I’ve heard of EBB’s that would fit the Viaggio, but I’ve never seen one. To be honest, I’ve never seriously looked into it. I did consider changing out the tensioner for a better (quieter) part, and I’m sure it could be done with a little MacGyver-ing. Unfortunately, I don’t yet have a part that I could recommend. My workaround has been to bathe the stock tensioner in lube before every ride 😉
If you take this upgrade on, please let me know how you make out!
Jay
Check out the Trickstuff Exzentriker. We put one on our Viaggio and it works great.
Thanks for the tips
my partner and I have enjoyed our tandem, with a sprung stoker seat post and upgraded brakes.
My front deraleur does not work well at all, requires my stoker to take her foot out of the clip and push the chain to shift on a hill. My local bike shop was no help in adjusting it. Could you recommend a replacement model FD?
thanks
Bought the more recent blue version from another vendor. This came with quick release
skewers for front and rear wheels and presta valves. Hubs were not too loose or too tight,
and found none of the metal shavings in rims that other people reported.
For the money, it’s a worthy tandem. Frame is solid and components are OK … what you
would expect for the money. Delivery box arrived bashed up which resulted in some paint
wear/scrapes on the frame.
I added a new set of brakes and took off the noisy tension wheel (works perfectly and quietly
now). Definitely recommend both. This was without using half link which I might as the chain
naturally stretches.
The chain rings appear to be bolted on to the triple, put it should be pullable from crank for
future upgrade/maintenance. Front derailleur/triple/shifting is now the weak link (clunky),
but works adequately.
Hey Eric–thanks for your input as I am also looking at getting one as I am a road bike enthusiast and would like to get my wife into riding. Again, thanks for you input as I continue shopping.
John from NorCal
Awesome explanation of the high and low points of this bike! How wide of a tire do you think this bike could handle? I’m wondering if it could handle some smooth gravel roads with a wider tire like a 35c Clement X’Plor USH tire. Thanks!
Hey Jay, check this out:
https://cimg1.ibsrv.net/gimg/bikeforums.net-vbulletin/2000×1504/20190331_102935_d3a8bb26b48a29ab0b0a45d038d3b5ee2347314f.jpg
Eccentric bottom bracket for out Viaggio!
That’s so cool! Thanks John!
Great review … not only did this article directly influence my purchasing one about a year and a half ago (a blue one I got for a steal through Kohls, of all retailers), but I have actually been regularly referencing your review since the purchase for guidance on the upgrades, as I have been gradually modifying the bike. We put about 550 miles on ours last Summer biking throughout the Chicago/Cook County forest preserves. Great ride, solid frame and a real value (the next cheapest I could find was a Raleigh on clearance for $1800). The components do indeed need some switching out. We’re modifying it further for next bike season, and it has become a bit of a “Frankenstein” bike to suit our needs and riding style…cruiser bars for the stoker position (my wife’s preference). hybrid tire on the front wheel with the stock road tire in the rear, the list goes on and on. No doubt I’ll be coming back to this review for next bike season. Thanks a million Jay!